
For clients to order and manage our hosting services, we use a simple and user-friendly dashboard.
For a quick start, we decided to make an introductory guide and collect all the instructions from our knowledge base that you may need.
In this article, we will tell you about major dashboard features and answer the most popular questions of our clients.
Dashboard at a glance
The dashboard is powered by ISPmanager, a hosting control panel. We have chosen this panel because it is easy to use and understand and offers users broad functionality.
Major dashboard features
You can:
- buy virtual private and dedicated servers
- order services
- manage servers and services
- add new users and assign them roles
- add funds
- obtain statistics
- contact technical support
We will tell you more about the most popular features.
VDS management
You can manage virtual private servers directly from VMmanager.
VMmanager offers you basic operations, such as:
- Enable, disable, and reboot a server
- Reinstall an operating system
- Add IP addresses
- Check outgoing and incoming traffic statistics
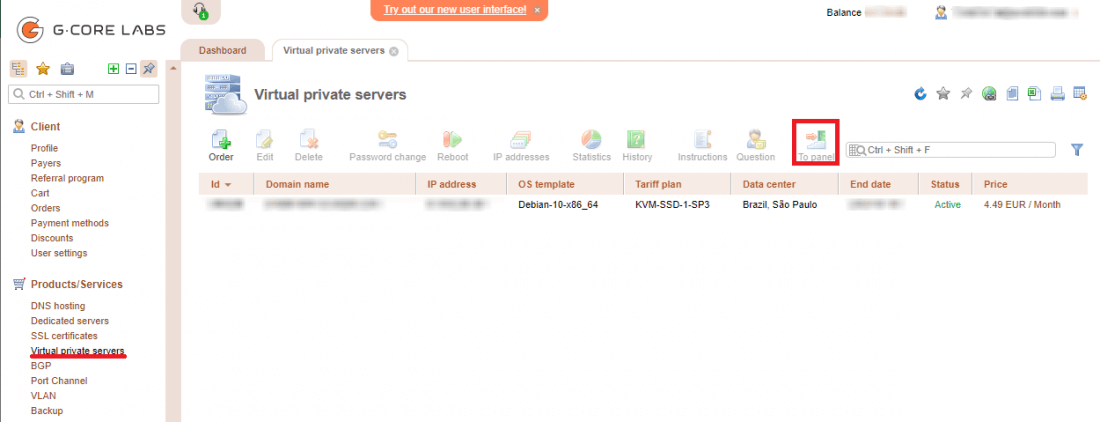
In order to log in to the control panel, in the Products/Services menu, go to Virtual private servers, choose a server that you need and click To panel.
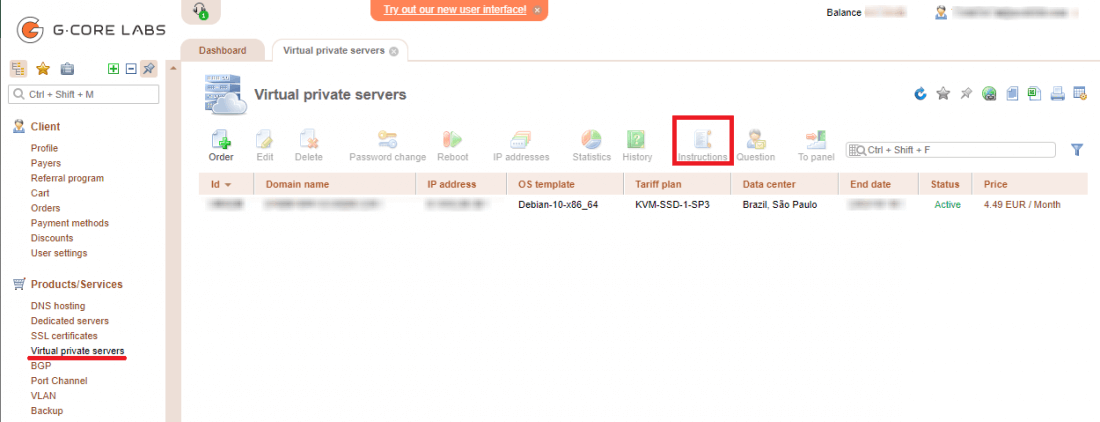
You can find credentials to log in to the control panel in our email we have sent you after server activation and on the Instructions tab.
Most control panel features are fairly simple. OS reinstallation is a more complex operation, which we will dwell on in more detail.
How to reinstall the operating system
You have two options:
- Replace the operating system with one of our OS templates.
- Install any other OS from an ISO image.
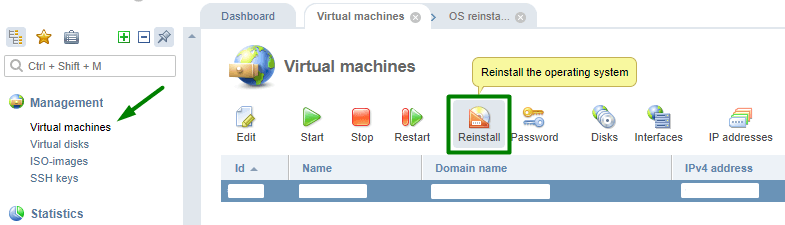
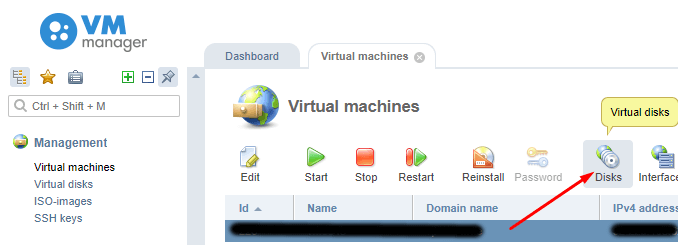
It is very easy to replace a system with one of our OS templates. On the control panel, go to Virtual machines and click Reinstall.
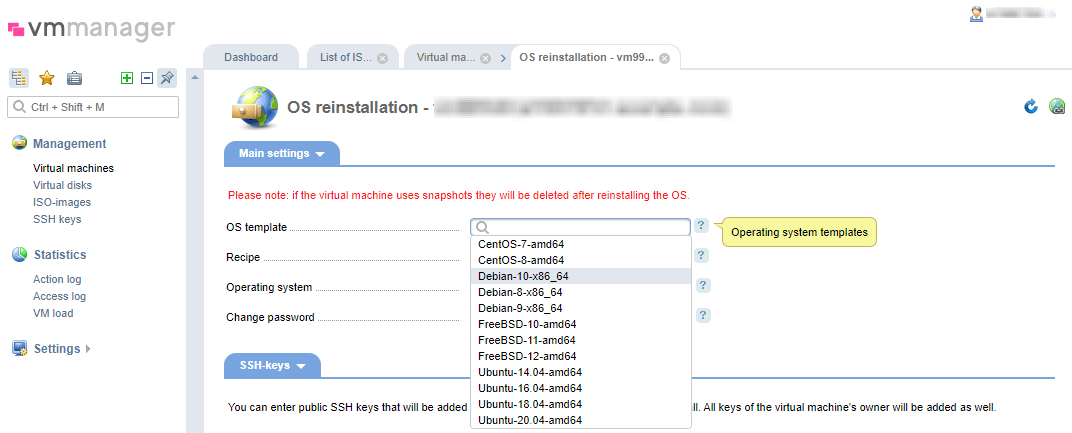
You will have a list of available operating systems:
- CentOS 7-amd64
- CentOS 8-amd64
- Debian 8-x86_64
- Debian 9-x86_64
- Debian 10-x86_64
- FreeBSD 10-amd64
- FreeBSD 11-amd64
- FreeBSD 12-amd64
- Ubuntu 14.04-amd64
- Ubuntu 16.04-amd64
- Ubuntu 18.04-amd64
- Ubuntu 20.04-amd64
Choose one and click OK. The system reinstallation begins.
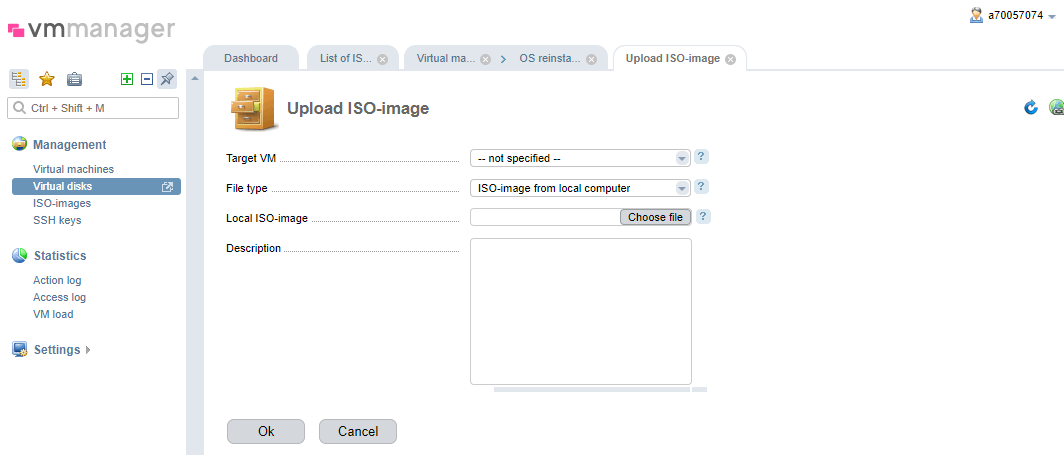
If you want to install your own operating system, you should upload an ISO image.
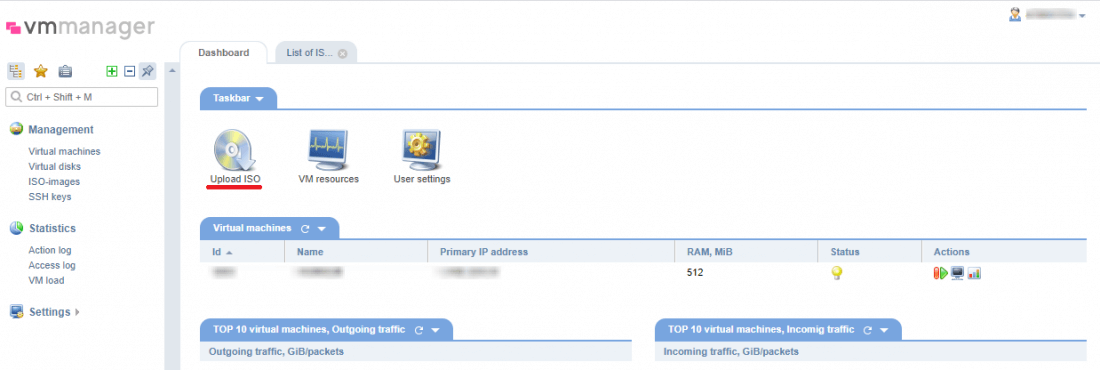
Go to Upload ISO.
In the new window, enter parameters:
- Target VM is a virtual machine, on which an image will be installed.
- File type is an image upload method. You can upload the file from your local computer or enter a URL to upload the file from a different server.
- Description is an optional field. Here you can leave notes for yourself.
If you choose an image from your local computer as a file type, you should choose a respective file from PC in the field below.
If you choose URL to the ISO image on a remote server, enter a download URL and file name.
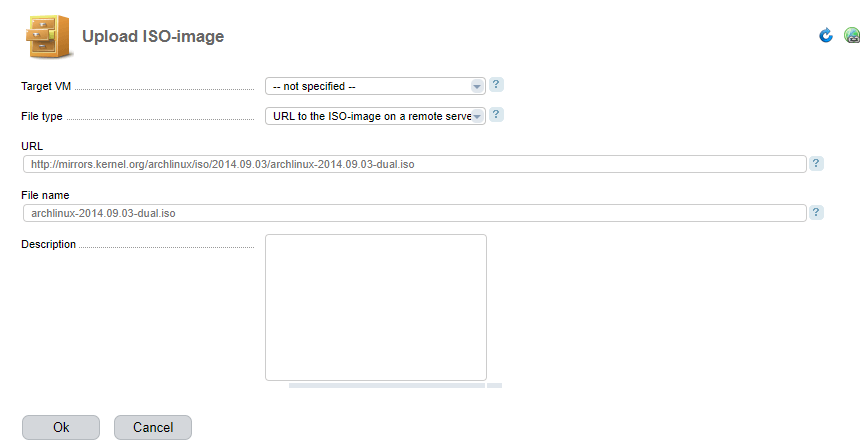
Complete all the fields and click OK.
ISO images have certain restrictions:
- You can upload 3 files max.
- The size of each file may not exceed 8 GB.
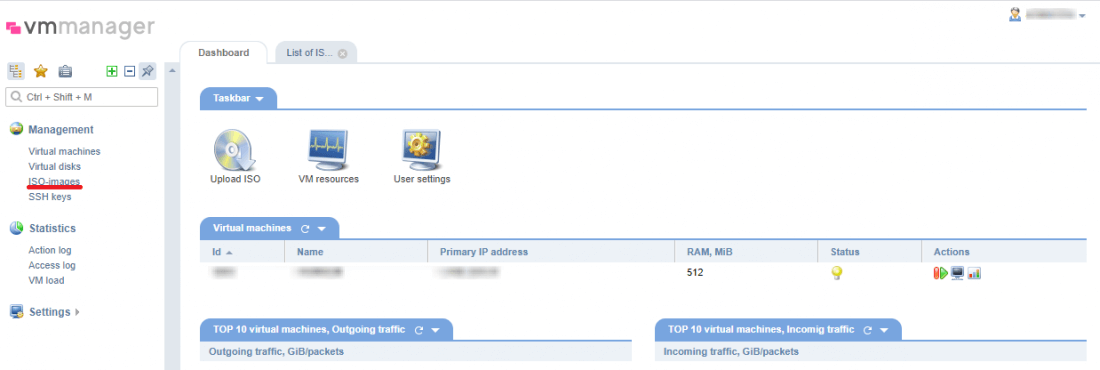
Once uploaded, the ISO image will become available at Management > ISO images. It will be available for 24 hours. If you need to keep an image on the control panel longer, contact technical support by submitting a ticket on your dashboard (see below how to do it).
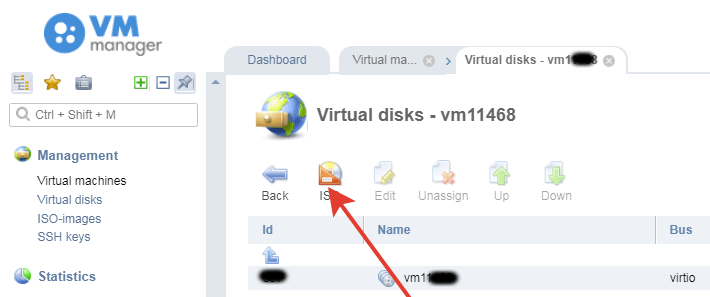
In order to mount an image, disable the server and go to Disks.
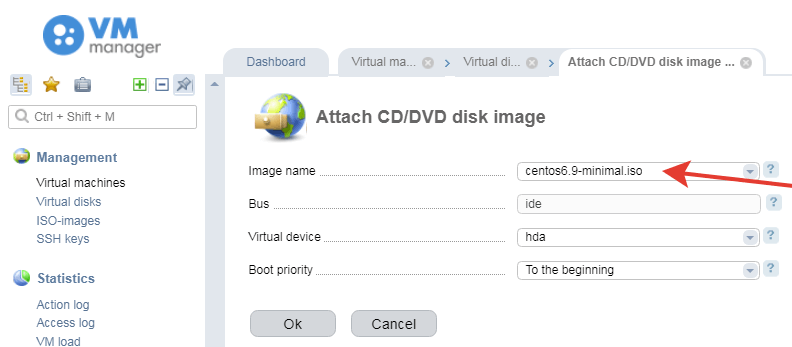
Click ISO and choose the image you need from the list.
In the Boot priority, choose To the beginning and click OK.
If you have done everything right, the ISO image will be available from the list on the Virtual disks tab.
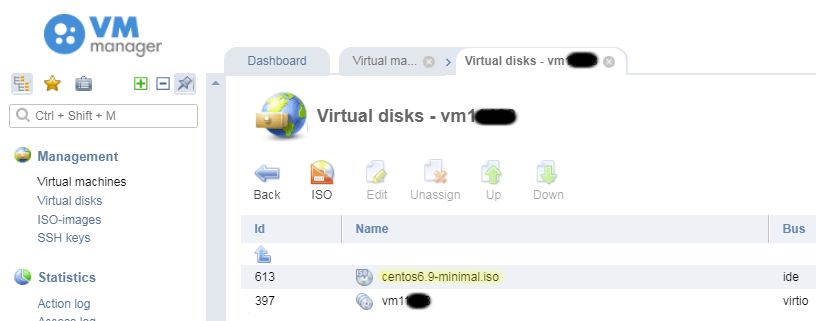
Start the virtual private server.
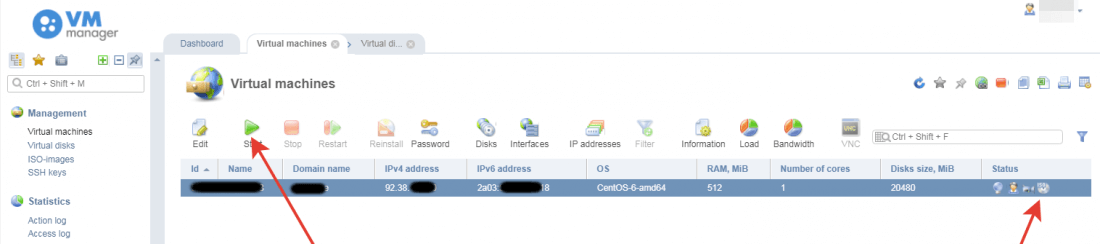
That done, you can check the ISO image upload menu via the VNC remote access system.
VNC
VMmanager offers you basic server operations. However, full-scale VDS administration is available from VNC. This is a remote access system, using which you can manage all settings and applications.
You can log in to the system from VMmanager. Go to Virtual machines, choose the server you need and click VNC.
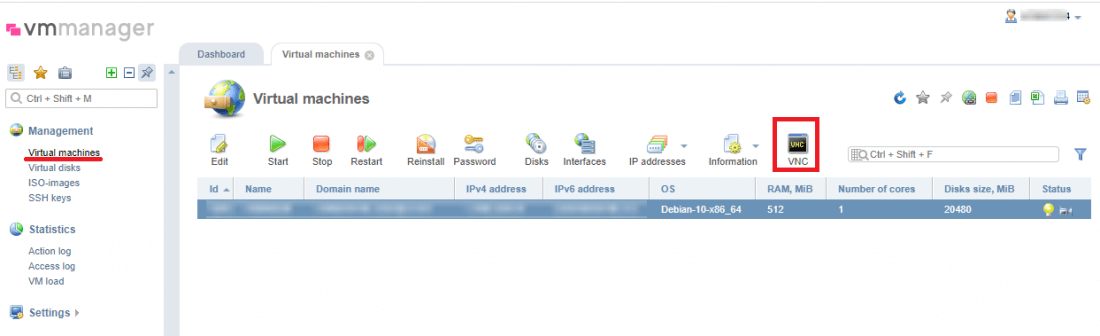
You can find your username and password to log in to the system in our server instructions we have sent you after the server purchase.
For more on virtual server management and setup, see our knowledge base.
Management of dedicated servers
You can manage dedicated servers from DCImanager. You can log in to the system by clicking the link or on your dashboard.
If you go to the panel by clicking the link, you will have to enter your login and password. You can find them on the Instructions tab.
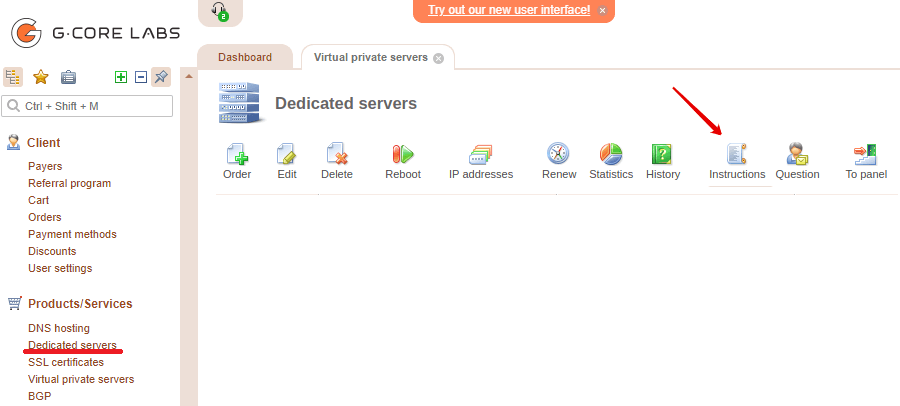
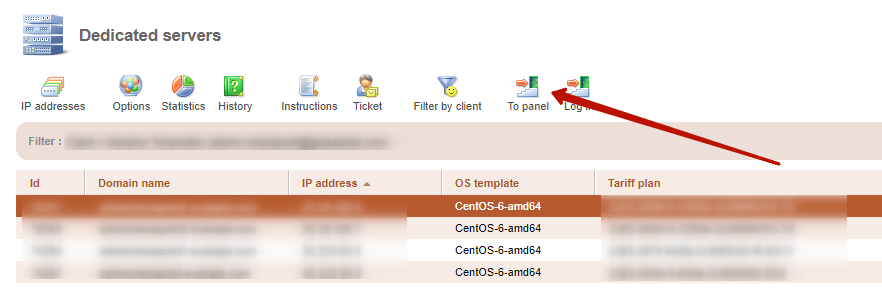
Or on your dashboard. To that end, go from Products/Services to Dedicated servers, choose the server and click To panel.
On DCImanager, like on VMmanager for VDS, you can carry out basic operations with dedicated servers, such as enabling and disabling, rebooting servers, replacing OS, checking statistics, etc.
How to reinstall the operating system from template
You can replace a system on dedicated servers with one of our OS templates or install your own from an ISO image in pretty much the same way as on VDS.
It is quite easy to replace OS with one of our OS templates.
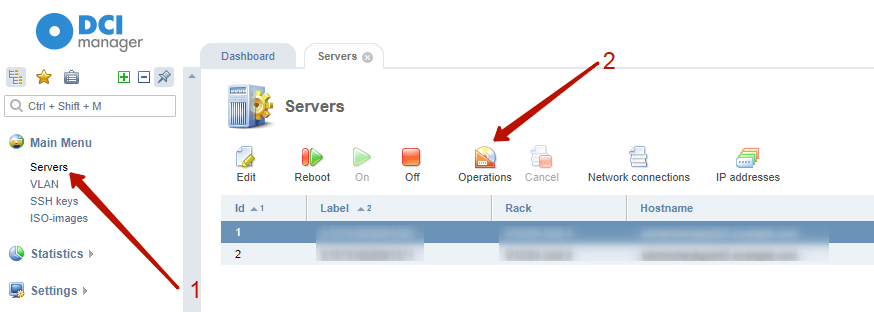
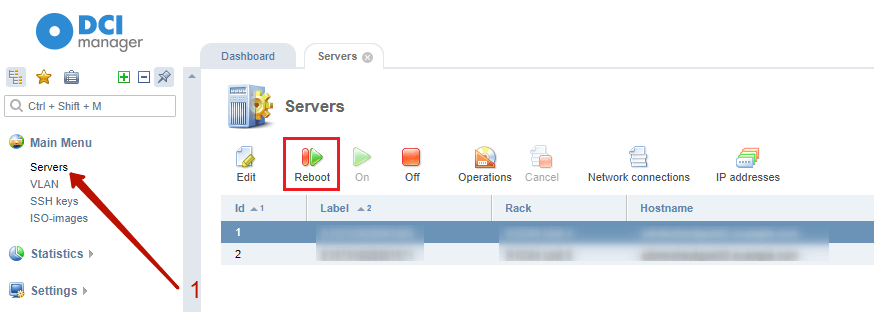
On DCImanager, go to Servers, choose the server you need and click Operations.
In the Operation type field, choose Install OS from template and then specify the system you want to install. Available OS templates for dedicated servers are the same as for virtual servers. Click OK.
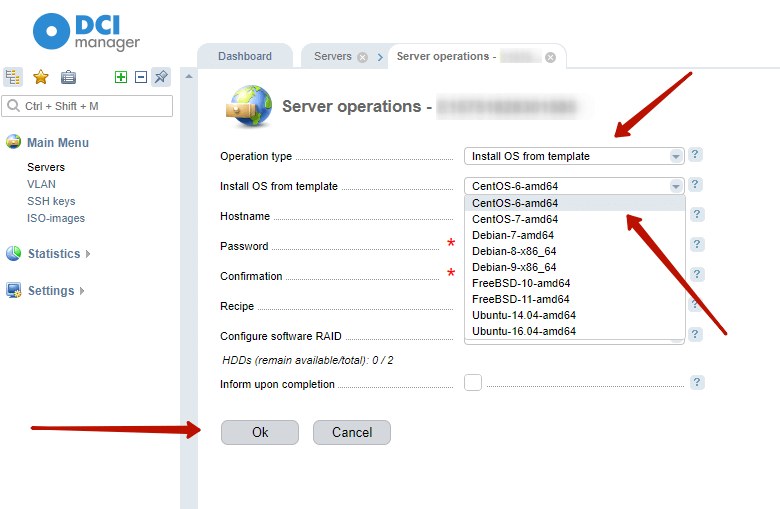
If you want to get a notification after OS is uploaded, tick Inform upon completion before clicking OK. You will get a notification as soon as the installation is complete.
But it will be more difficult to install your own OS on a dedicated server from an ISO image. You will need a remote server management console—IPMI.
IPMI
IPMI is a console for remote monitoring and management of dedicated servers. As in the case of VNC for VPS, IPMI is designed for full-scale administration, management of settings and applications.
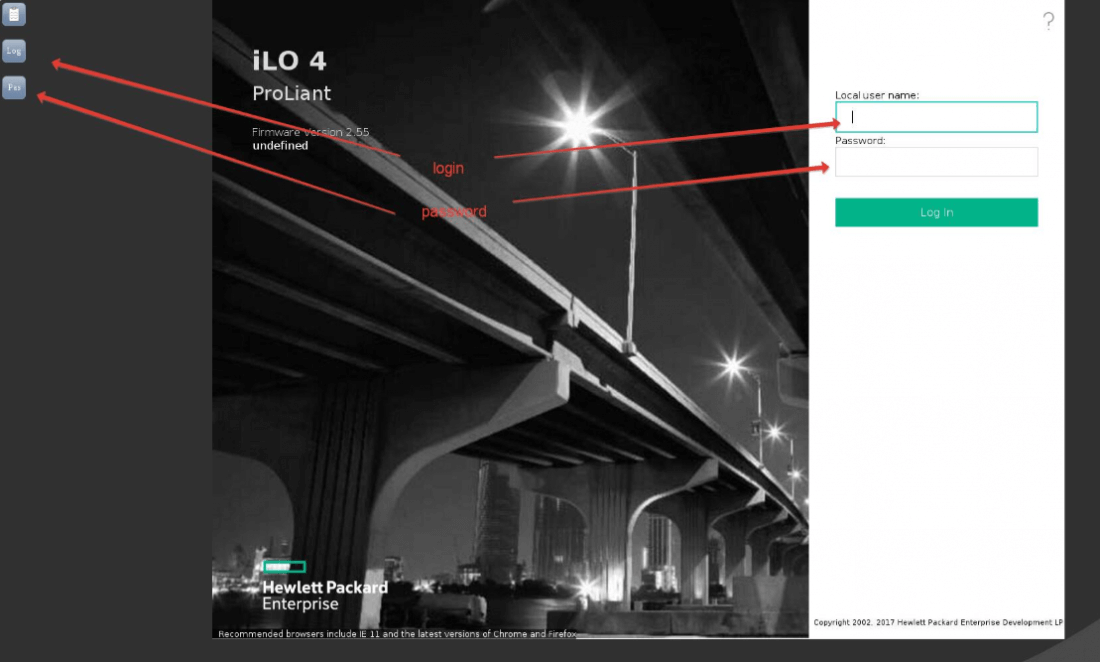
You can log in to the console from DCImanager. On the Servers tab, click the monitor icon opposite the server you need.

You will be directed to the authorization page. Click the Local user name field and click Log. The field will be completed automatically. The Password field is completed in the same way—place the cursor into the field and click Pas, then click Log in.
How to replace OS with OS from your ISO image
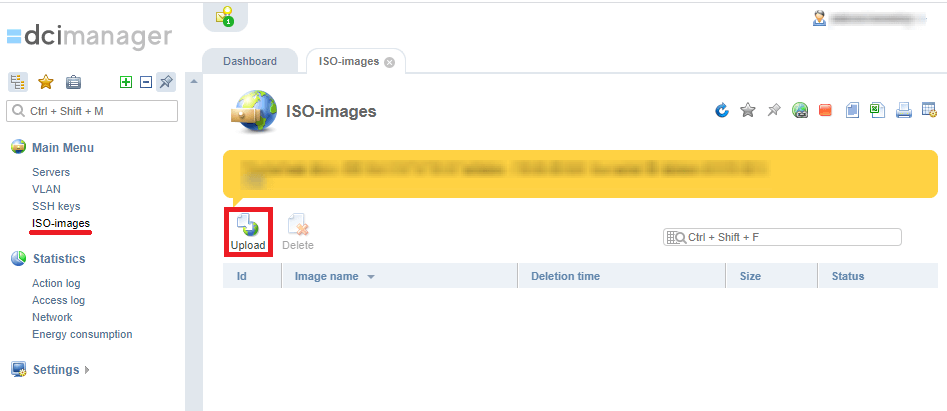
First, you should upload an ISO image of the operating system. On DCImanager, go to the main menu, choose ISO images and click Upload.
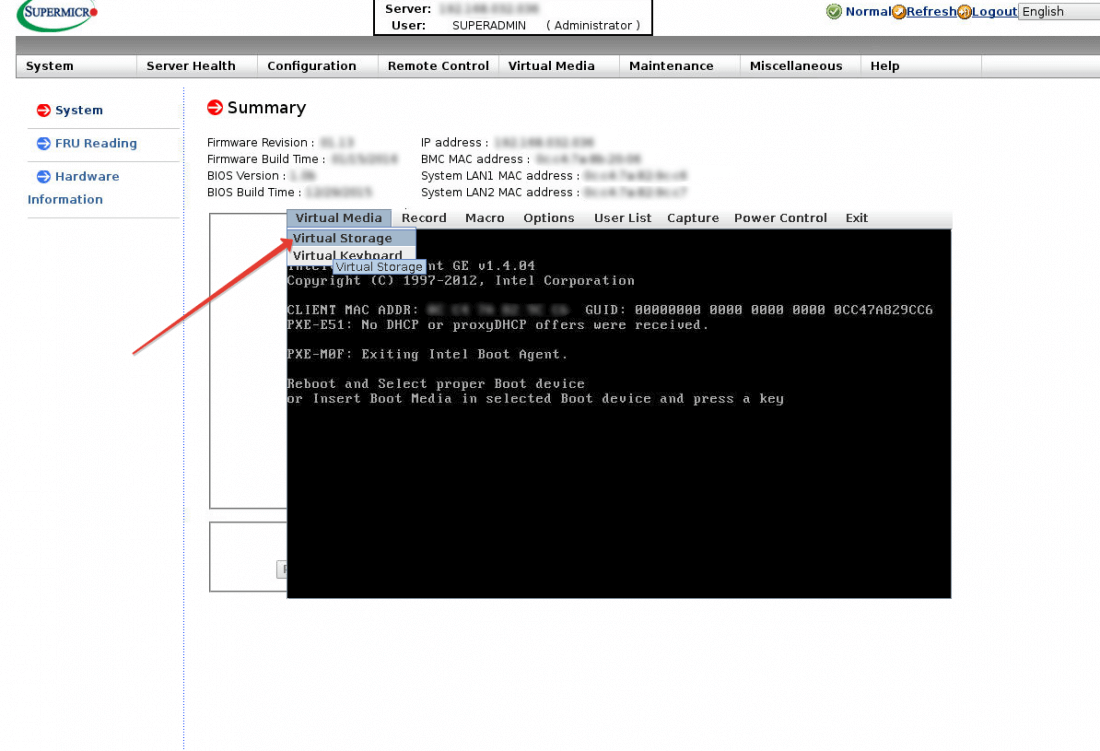
Then, go to IPMI and choose Virtual Storage.
In the Logical Drive Type field, choose ISO File and click Open. In the new window, go to the ISO folder, choose the image you have uploaded and click Open.
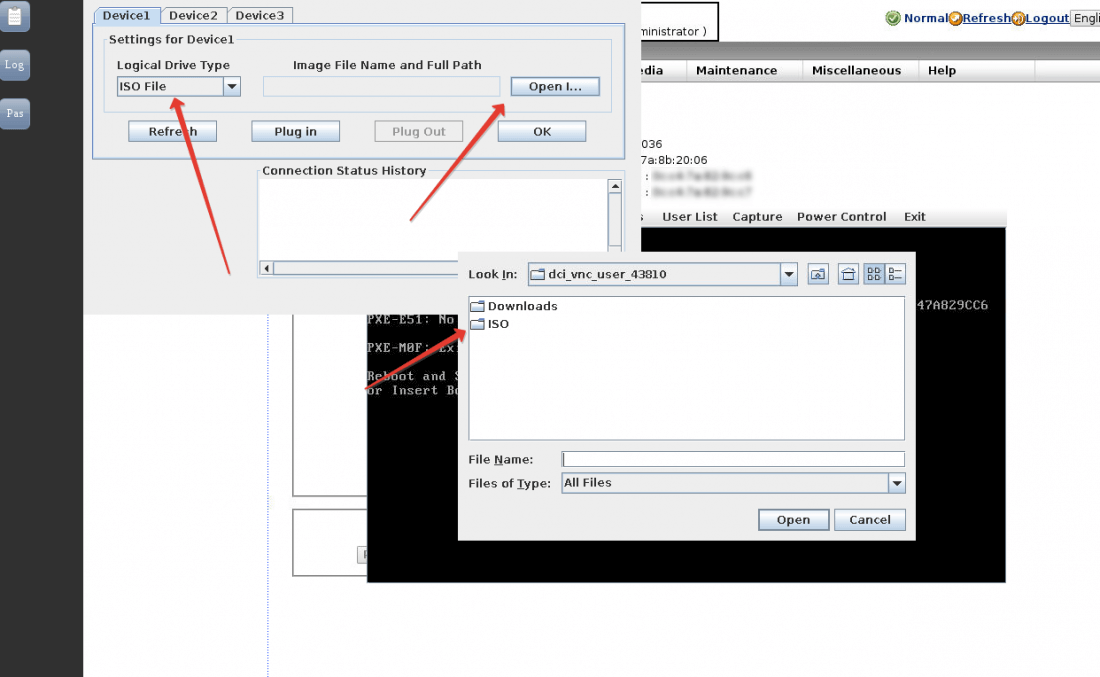
Then, click Plug in and click OK. That’s it! The image is mounted.
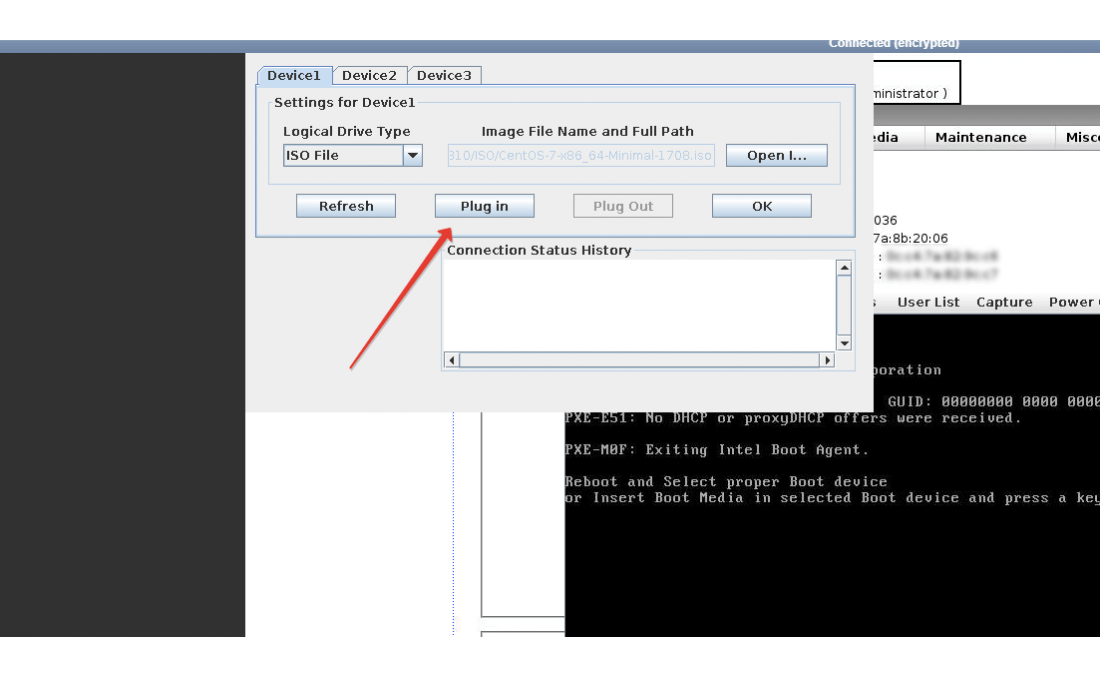
In order to start OS installation, reboot the server on DCImanager.
For more on dedicated server management and setup, see our knowledge base.
Payments and adding funds
We have a more detailed overview of payment methods in our article “How to pay for and renew a server”. We also have a detailed article about payments in our knowledge base.
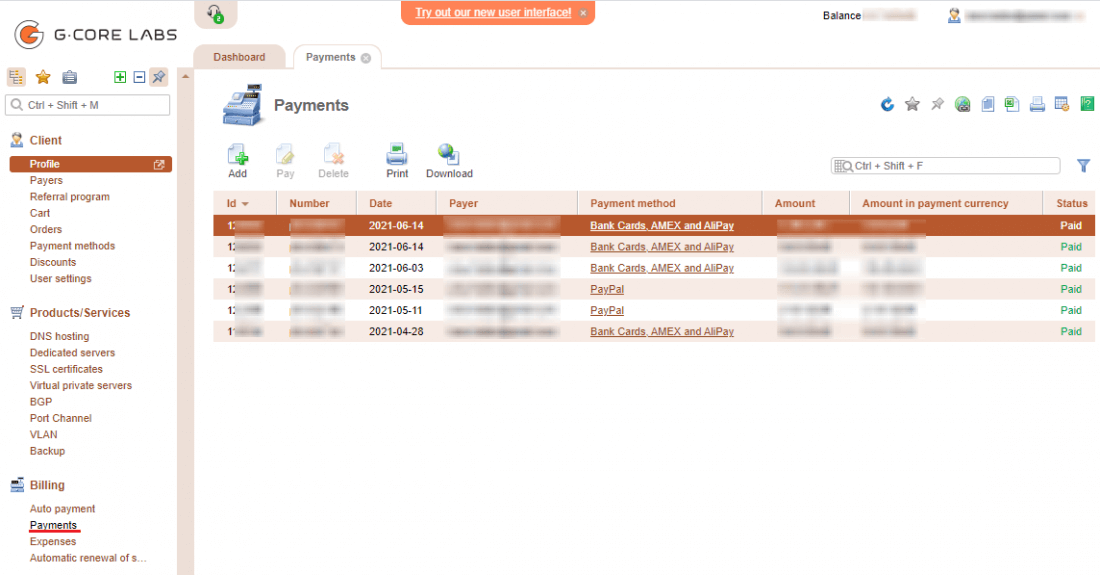
In order to check the payment history, on the Billing tab, choose Payments. You will see the list of all your transactions.
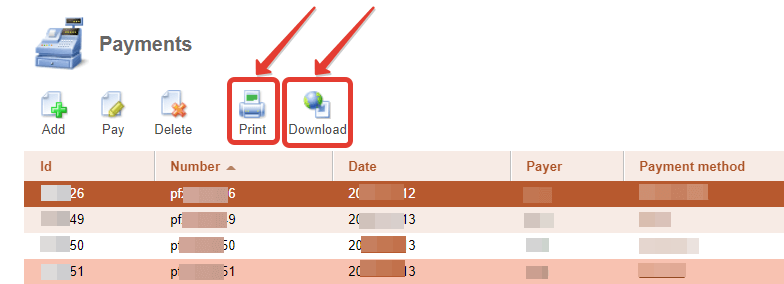
You can print any payment receipt or save it as PDF. To that end, select the payment you need and click Print or Download.
Adding users
Sometimes, you need access to several user dashboards to manage hosting services. But it is not safe to share your username and password with other people. Therefore, you can add several users to a single dashboard.
On the Tools tab, click Add a new user.
Enter:
- username
- password
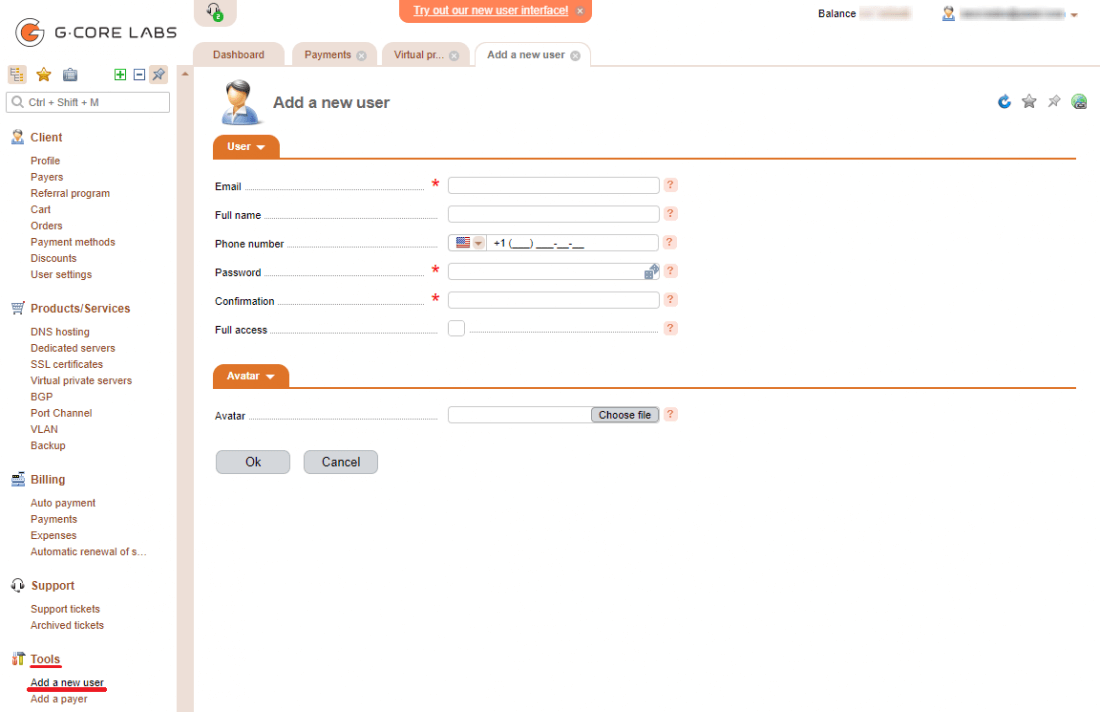
The user will use these credentials to log in to the system. In the future, the user can change their password.
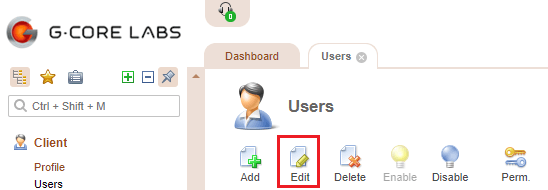
In addition to adding users, you can also grant them certain permissions and disable them.
Full access permissions
You can grant a new user access to the full dashboard functionality.
On the Client tab, go to Users, choose the user you need and click Edit.
On the new tab, you will see the Full access permissions line. If you want to grant the user full access permissions, tick the box in this line.
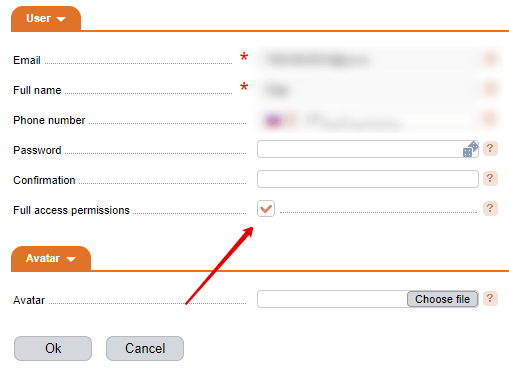
If you want to disable the user, make sure that the box is not ticked.
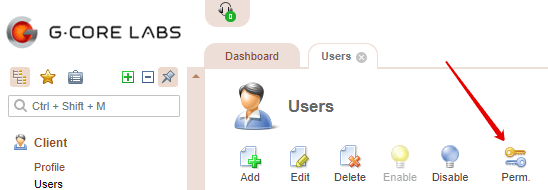
Disabling permissions
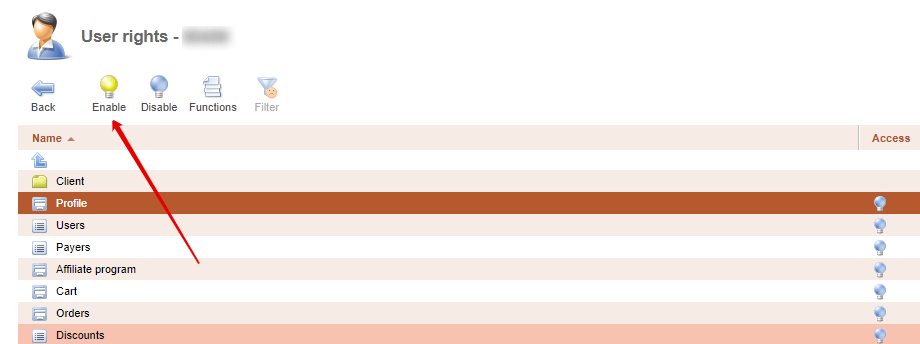
If you want the user to have access only to some of the dashboard functions, you can disable their permissions. On the Users tab, choose the user you need and click Permissions.
This will bring a new window with a list of permissions. They are grouped by dashboard sections and tabs. You can grant or revoke access to any of them.
In order to grant access to a certain section or tab, choose it and click Enable. Click Disable to revoke access.
Disabling a user
Any user can be disabled. To that end, on the Users tab, choose the user that you want to disable and click Disable.
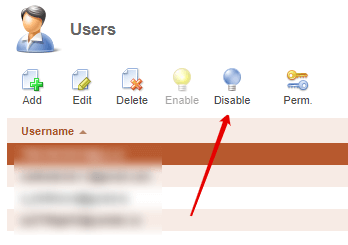
This function comes handy when one of your team members quits the project, for example. We also recommend that it is used when clients lose access to email, with which they signed up.
If you no longer have access to email, you should add a new user with the email that you currently use and disable the user with the old email.
Technical support
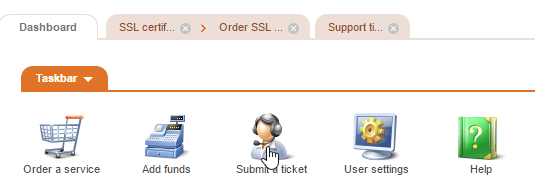
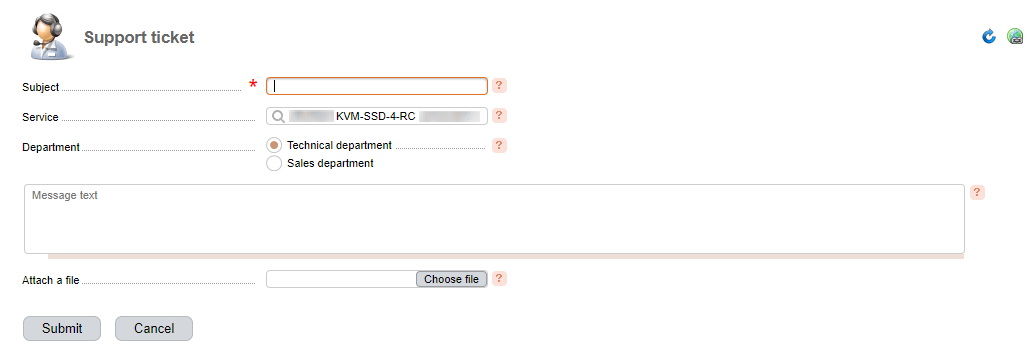
Our technical support is available 24/7. On your dashboard, you can contact technical support by sending a ticket.
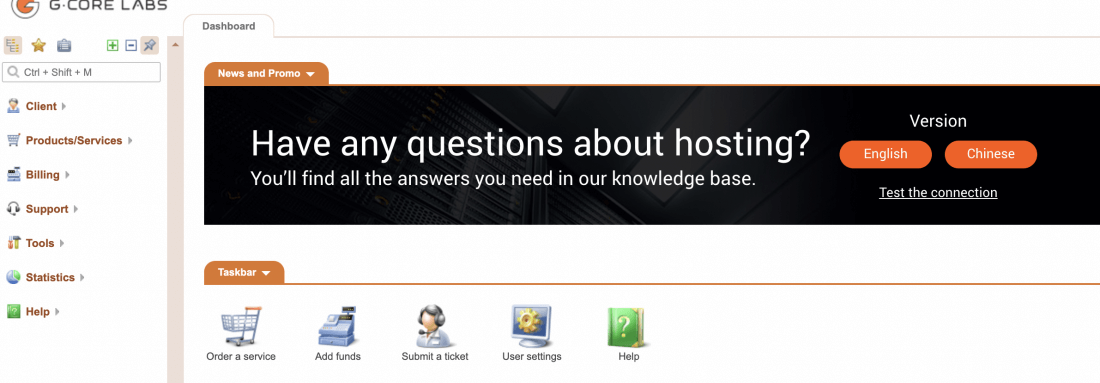
For that to happen, on the dashboard, go to Taskbar and click Submit a ticket.
You can also ask a question about a specific service. To that end, go to the tab with the respective service, select it and click Question.
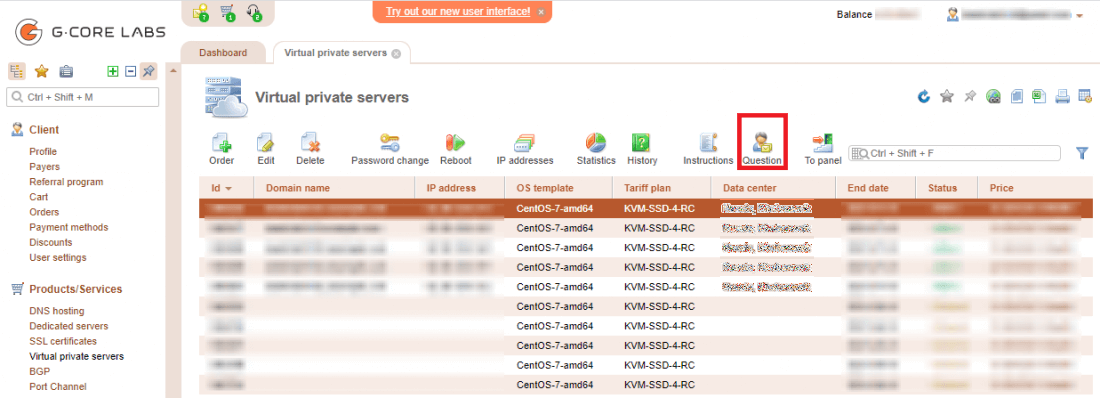
Once done, service ID and name will be added into the Service field automatically.
What services can be ordered via dashboard
In order to buy a server or order a service, on the dashboard, click Order a service.
This will bring a new tab with the storefront listing all available services.
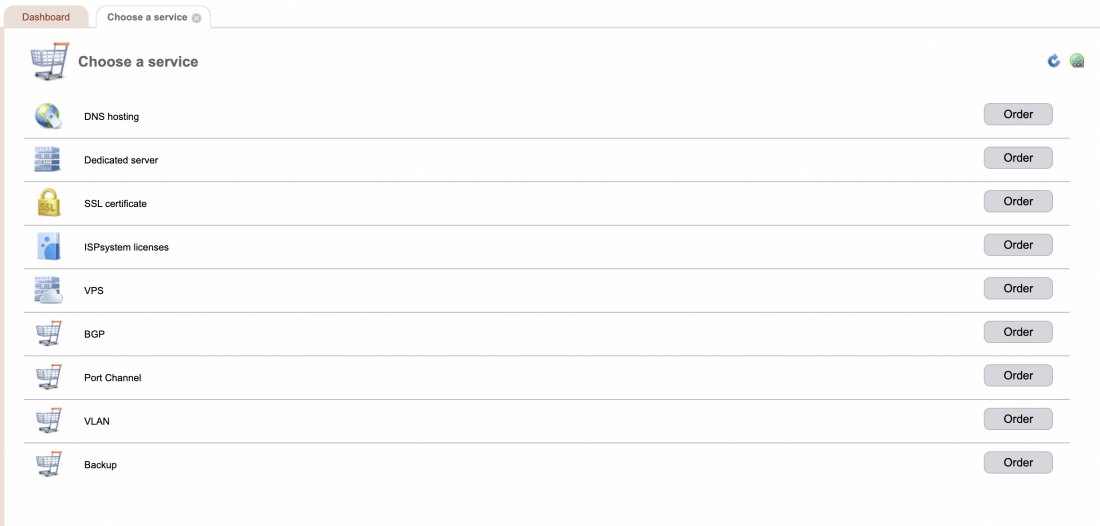
1. Dedicated and virtual private servers. For more on buying dedicated and virtual private servers, read our article “How to pay for and renew a server”.
2. Additional IP addresses. You can buy up to 10 additional IPv4 and IPv6 addresses for VDS and up to 15 addresses for the dedicated server.
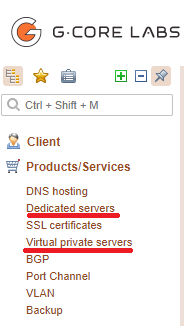
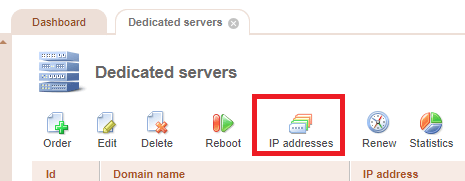
In order to buy additional IP addresses, in the Products/Services menu, choose virtual private or dedicated servers.
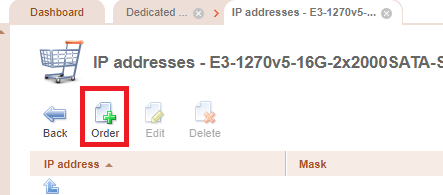
Choose the server you need and click IP addresses.
Click Order.
Enter the type and number of addresses you need and pay for your order.
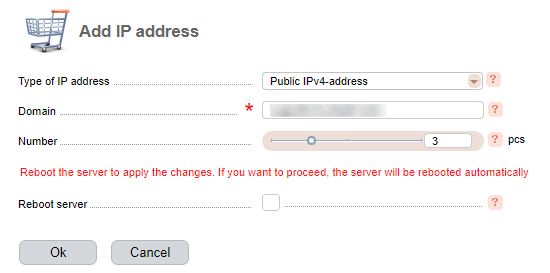
That done, you should configure additional IP addresses. The easiest way to do it is to reinstall OS, in which case everything will be configured automatically.
But if you cannot reinstall OS, you can configure IP addresses manually. Here’s a list of instructions we have collected for most popular operating systems.
3. DNS hosting. You can host domains on our DNS servers and speed up your web resources. More on DNS.
4. Backup. Using this service, you can back up your data and server configurations.
All backups on our hosting are created via Acronis. If you want to add a service, place an order on the storefront and make a payment.
Wait until the service is added (this usually takes about a day). We will send Acronis account credentials and a guide on how to use the service to your email.
5. SSL certificates. They ensure the security of data transmitted between the website and the user. Check instructions on how to order and how to activate an SSL certificate.
6. VLAN—a consolidation of servers into a local network. This service is available for dedicated servers only. You create a virtual local network and can work on an internal network regardless of physical server locations.
The service is free. In order to set up VLAN, you should use DCImanager.
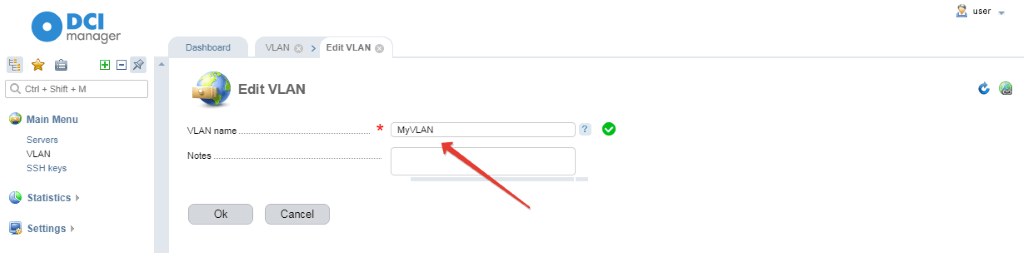
On the main menu, choose VLAN and click Add.
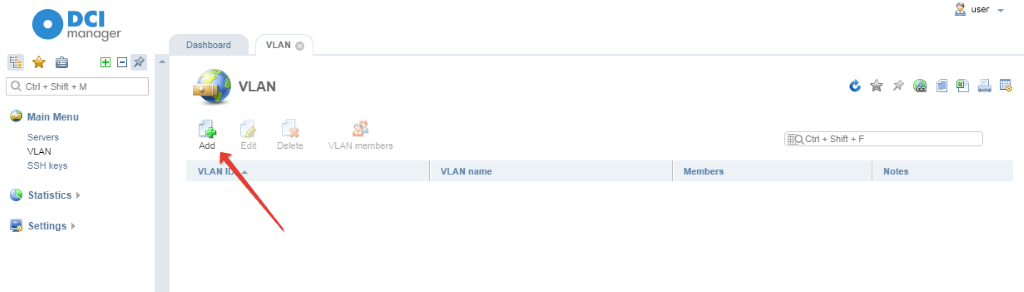
Enter a name for VLAN (any) and click OK.
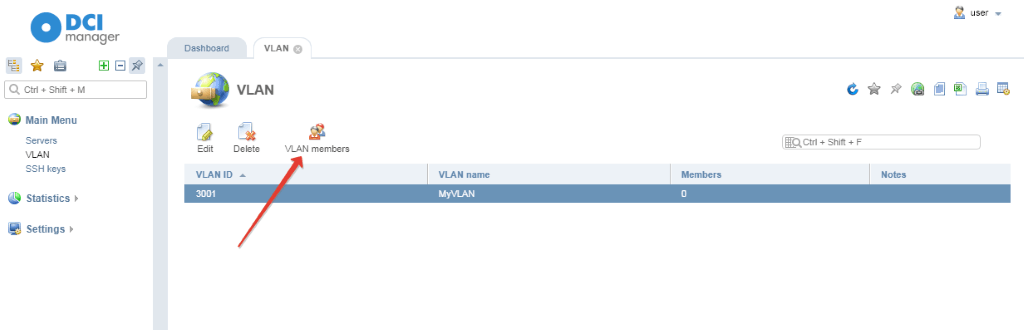
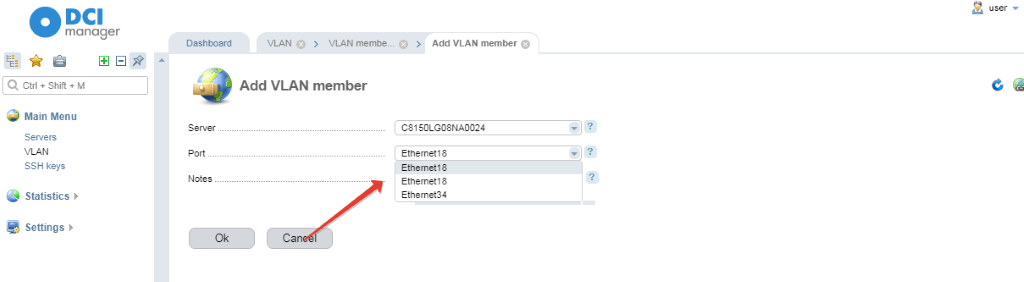
Then, you should add servers to the network. On the VLAN tab, choose a newly created VLAN and click VLAN members.
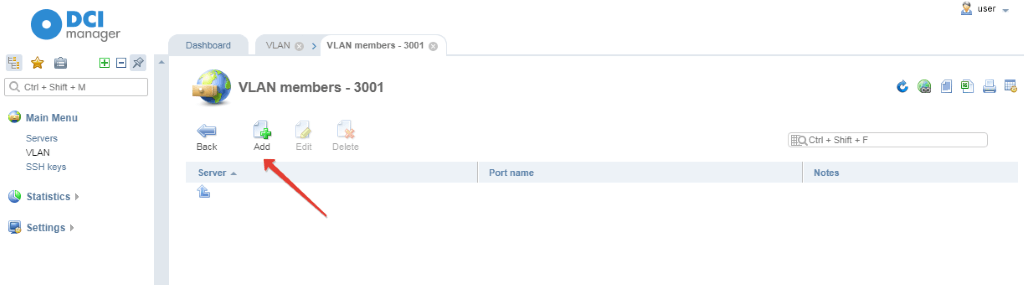
Click Add.
Choose a server you want to add to the network.
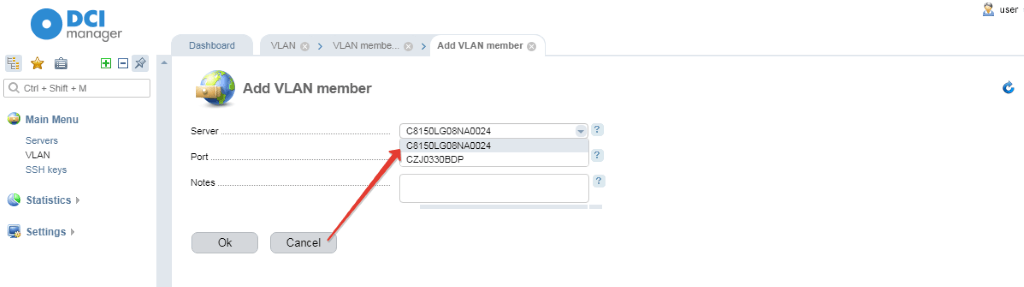
In the Port field, choose an interface of the server and click OK.
You can add as many servers to the network as you want.
7. BGP—the announcement of your IP addresses to the server. This service is available for dedicated servers only.
Activation guide. Prices are available on the BGP tab.
8. LACP—bundling several physical channels into a single logical network. This service is available for dedicated servers only.
For activation and setup, check our knowledge base. Prices are available on the LACP tab.
How to renew or delete a server
We have already talked about server renewals in our article “How to pay for and renew a server”.
In order to delete a server, in the Products/Services menu, choose virtual private or dedicated servers, select the server and click Delete.

But be careful! The server will be deleted permanently.
VDS can be deleted only if you use it for more than a month.
Conclusions
- The Gcore Hosting dashboard is a convenient tool to manage services.
- The dashboard allows you to manage servers, add new users, add funds, check statistics, and much more.
- On your dashboard, you can buy virtual private and dedicated servers, additional IP addresses, SSL certificates. You can also activate backup or DNS hosting.
- Dedicated servers can be bundled into a VLAN; channels can be aggregated with LACP, while BGP can help you announce your IP addresses.
- All useful instructions and information about major dashboard features are available from our knowledge base.
Still have questions?
We did our best to highlight all major hosting dashboard features and yet there is so much left to tell, of course. If you still have questions, check our knowledge base. There is a lot of useful information there.
You can direct any of your questions to our technical support. Our team is always there for you.
Still have no hosting account with Gcore and looking for reliable servers for your online project? Get a free consulting session. Our managers will tell you which solution is best suited for your needs.
Or order a necessary configuration on your own.